Mobile users:
For best results, view in Landscape mode.

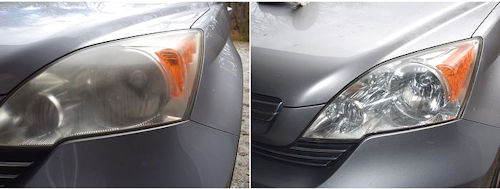
The last thing you need when you're driving at night or in the
rain, snow or fog is dirty car headlights.
The clear coat on your headlights degrades over time due to
get dull, faded, cloudy, and hazy due to oxidation road salt,
pollution, and natural aging.
Cleaning plastic headlights using basic home remedies will
usually only produce temporary results.
Never clean clear plastic with wax, polish or any chemical
that's not formulated for the task.
Toothpaste:
If the headlights are only slightly foggy, you can try and restore
them using an abrasive, such as toothpaste for an easy way to clean
and defog headlights.
First, wash your headlights with warm, soapy water and rinse.
Apply automotive-grade masking tape.
Carefully apply the tape to the area around the headlights to protect
your car’s paint.
Use regular toothpaste containing baking soda, not the gel kind.
Or you can add baking soda to the toothpaste you buy, as it
will add a desired abrasive element to the toothpaste.
After cleaning the headlight, apply toothpaste to the onto the wet
headlight with your fingertips.
Be careful to keep it away from your car's paint job, the baking soda
mixture could tarnish your paint job.
Apply a good, solid coat.
Use a small brush or toothbrush, begin with small circles and brush
the toothpaste into the plastic to remove grit and grime from all
crevices.
Start from the middle and spread out toward the corners of the
headlights with your brush.
Continue until the toothpaste is completely wiped away.
Then using warm water, remove all residue of the toothpaste from
the plastic.
You can repeat these steps as necessary to improve the quality
of the outcome.
If you want to extend the life of your nice clean lenses, apply a
UV Sealant or Clear Coat for headlights.
Caution:
Carefully remove the tape when you are done, due to the tape
may lift off the paint on some older cars.
Restoration Kit:
First, wash your headlights with warm, soapy water and rinse.
Dry with a clean cloth.
Apply automotive-grade masking tape.
Carefully apply the tape to the area around the headlights
to protect your car’s paint.
The only way to permanently restore the clarity of oxidized
plastic headlights is to use a headlight restoration kit or
replace the lenses altogether.
When choosing a restoration kit, look for one that contains
different grades of sandpaper, a plastic cleaner/polish,
polishing cloths and a protective coating.
One kit usually has enough to clean 2 headlights.
The best headlight cleaning and restoration kits will come with
abrasive sanding discs and polishing pads.
If you use this type of kit, it can permanently remove hazing,
cloudiness, and oxidation to restore the like-new
condition of the headlight.
Find the coarsest piece of sandpaper in the kit.
Note: the lower the number, the more abrasive the sandpaper.
For example, if your kit contains the grits '1000', '2000, and '3000',
the piece of '1000' sandpaper is the most abrasive.
Spray headlights with soapy water.
Use a spray bottle to apply a solution of soapy water to one
of the headlights.
Dip the coarsest piece of sandpaper into soapy water.
Make sure it remains wet the entire time you’re sanding;
otherwise, you’ll leave deep scratches in the lens.
Make sure you sand in the same direction the entire time using
straight horizontal strokes, make sure the sandpaper stays wet.
Make sure you follow the product instructions closely for
each step.
Repeat steps using each of the less abrasive pieces of sandpaper.
Use each piece of sandpaper one at a time.
Do not rush through it.
Depending on how foggy headlights are, this could take 15-20
minutes per headlight.
As you sand, run your hands over the wet headlights.
If you feel rough spots, sand until smooth.
Once you’re done, clean each lens with a soft cloth.
The headlights will look hazy after sanding but they’ll be clear after
applying the coating.
Be sure to use the instructions listed on the product for the
best results and to avoid damaging your
vehicle.
If you only clean the lenses then the sun and other elements
are going to quickly fade the lenses again and ruin all your
hard work.
Apply polish and wax:
Squeeze a small amount of polish onto a clean cloth.
Using light pressure, move your hand in circular motions to apply
the polish to each of the headlights.
Wipe the headlights clean, then apply a coat of wax.
Take your automotive detail wax and apply a coat to each of
the headlights. Wipe them clean.
Then apply UV headlight sealant to each of the headlights.
Make sure the headlight is completely dry before applying the
protective sealant.
Make sure to follow the instructions that come with the product
for proper application.
Cure sealant in the sun.
After applying sealant, face the headlights out in sunlight
or use a UV light to cure.
Allow to cure for the specified duration, as outlined in the
product information.
Allow the sealant to completely dry overnight before
using the car.
Note:
To keep foggy headlights clear, wash often with a mild detergent
and a soft-bristle brush or sponge, flush with plenty of
water and dry.
Disclaimer:
If you're not familiar with how
to restore headlights, you could
run the risk of ruining them
completely if you use a kit.
Make sure to follow the instructions
that come with each product for the
best results, proper application,
and to avoid damaging your vehicle.
Make sure you follow the product
instructions closely for each step.